
HD Cameras
We used new high definition cameras in the filming of our music video; these differ in many subtle ways to the DV cameras we used last year, such as improved quality of footage, different screen size/shape, different settings and ability to film in different lighting.
Also, there was no tape in the HD cameras to worry about keeping track of. By storing our footage digitally we knew it was safe.
However, we did come across some issues concerning lighting whilst shooting.
Our footage, when viewed on camera, seemed perfectly high quality as far as image definition was concerned. But upon returning to edit we realized the shots were a lot darker than we originally believed. This made it incredibly difficult to edit, and we were forced to deviate significantly from our original storyboard.
Adobe Premiere Elements
We used Adobe Premiere to edit our film, and the research we did pre-production. Adobe software is proffesional quality, so we were able to achieve similar results.
Below is a screen shot of premiere, showing the timeline;

- We were able to increase or decrease the size of our timeline, so we could either edit in fine detail, or inspect the whole project. This was useful for making fine cuts (to add to the fast paced cutting rate) as well as for checking our project was on track length-wise.
- We were able to view the toolbar as a thumbnail of the shots in that particular sequence; see above, the faces of the different members of our audience research are visible, and it is easy to tell the specific shots in the timeline from afar.
- We were able to manipulate the audio; by deleting the audio from all our video, we could then fit the music track underneath. However, by leaving the audio for the lip sync in place, we could make sure the editing in timing was perfect
- We could cut clips to any chosen length, or simply splice them to move different sections to different places. This was very useful in our arcade sequence, when some shots were used twice, or with a shot cut in between; giving the impression of more footage.

Above is another screen dump from Premiere. This is an example of our entire editing screen;
- Using the multi-coloured toolbar, we were able to manouevre the program, saving time scrolling through the options like the premiere we used last year. Examples of the toolbar tabs are 'Organize' and 'Edit'; using these we were able to store our raw footage in one place whilst editing a single shot in another.
- We were able to view all our available footage as thumbnails in the 'Get Media' section (right). This was very useful as we could assess quickly how many shots we had, as well as being able to find shots to drag-and-drop into our timeline. This enabled us to edit very fast and with confidence.
- The large screen gave us the ability to view our film at all times, or that particular shot. This was useful as it gave us far more detail than was available in the thumbnails, such as the possible need to reshoot through the mistakes in Mise-En-Scene (as we discovered)
- The red line pointer was used to manouevre the timeline, and to select which part of which shot to cut, or where to cut on action. This was very useful as we could use this tool to cut both video and audio simaultaneously, or just to cut one or the other.
http://www.blogger.com/ -----> used in all four stages
Having used Blogger.com last year, we were already familiar with it. It has been exceptionally useful throughout our project;
- An accessable portfolio of our group ideas and thoughts
- Useful for group collaboration work; the ability to comment and group post
- Able to compile all research, general information and project progress
- Ability to post images and video to document the passing of our project
- Ability to return and make changes to posts throughout the project as needs be
 This example shows how we were able to post videos and images.
It also shows how we were able to record text data alongside, which proved to be incredibly useful for recording extra data or for commenting on the images/videos.
Along the right hand side is the hyperlink toolbar; this shows a calender of our posts in chronological order, opening chosen posts when clicked. This was very useful as a visual simulation of the progress our project was progressing.
We were also able to access very old posts without wasting time searching; this saved us time when comparing our finished product to our original, or when returning to revise research.
http://www.youtube.com/ ----> used in all four stages
Youtube is a frequently used web 2.0 asset, and as such we were very familiar with it.
- It gave us the ability to watch professional videos at any time, for research
- We were able to post videos online of our preliminary work (for instance, pre-production mini projects to re-familiarize ourselves with editing techniques)
- We were able to comment on other videos, used in the evaluation and production stages to give our opinions and read the opinions of others
Below is an example of a video being viewed on youtube;
 Here, it is evident the high-quality research we were able to conduct at any time. Youtube also gives examples of videos that may be similar to the video currently being watched (see toolbar right) and through this we were able to gather more research than we would have done otherwise.
Being able to post on youtube, for instance our animatic, gave us freedom to access our work anywhere at any time, as well as showing it to others via the internet.
This helped during evaluation and construction as we were able to recieve ongoing comments and opinions throughout, which influenced our work.
http://www.slideboom.com/ ---------> used in planning and evaluation
Slideboom enabled us to post our Power Point slides online, where we could access them through our blog or any computer with an internet connection.
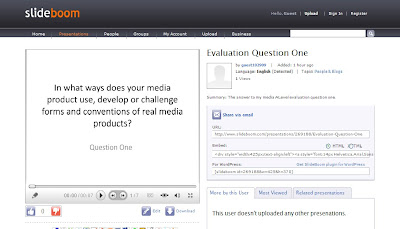
Above is an example of using slideboom to upload my evaluation question. The toolbar on the right contains URL and HTML embed codes, which we used to access these Power Point projects from our blog or from other presentations.
Adobe Photoshop (and Adobe Photoshop Elements)
Photoshop Elements is a very professional product that I thoroughly enjoyed using.
There are a huge variety of choices with the tools available to use; I learnt how to layer images and manipulate them. For more detailed examples of this, see posts labelled 'Digipack', examples of which are below;
http://twgsbmedia10a2group6.blogspot.com/2010/12/ch-digipack-background-image.html http://twgsbmedia10a2group6.blogspot.com/2010/11/ch-digipack-first-image-finalized.htmlBelow is an example of my digipack design, evidence of some of the skills I learnt in Photoshop.
1. This is the photograph I took of our lead singer and colleague Josh. I chose Josh because he has recognisable conventional 'indie' features, such as a very modern haircut and a genuine smile. I felt this would best attract our audience.
I darkened the image slightly, as well as heightening the contrast; this gave it the aesthetics of a retro photograph, such as a photograph of The Clash in the 1970s/80s (for further research on this matter, see posts labelled 'Digipack' and 'Research')
 Next, observe the toolbar, far right. The button highlighted is a tool enabling me to move between layers.
2. This is the next layer. Here, I have imported a font from http://www.dafont.com/ writing the word 'Technodanceaphobic'. I used the hand grab tool and image rotation tool (see top toolbar and toolbar far right) to rotate the image of this word to the angle of the banner.
 3. This is my final layer. Here, I have used the 'filter' tool to investigate the different effects of different filters (again, see Digipack posts for further detail)
The filter program enabled me to preview my image with a filter in place without making changes to the actual document. Below, observe the toolbar right; this is a list of the available filters. These include 'pixelate', 'sketch', 'stylize' and others; the one I have shown here (and chose) was the filter 'Stamp'.
 Photoshop was probably my most useful and most used technological tool throughout the construction, as I was the chief designer and creator of the digipack. I tried many different ideas before settling on my final design.
No comments:
Post a Comment